Update and usability improvements


Usability improvements:

  • Added scale, rotate and move anchor gizmos
  • Hold down shift key to maintain aspect ratio while re-sizing an object
  • Hold down ctrl key to increase object’s size by 10% while re-sizing an object or to change an angle by 15 degrees while rotating an object
  • Now you can drag an image or a file right into the folder
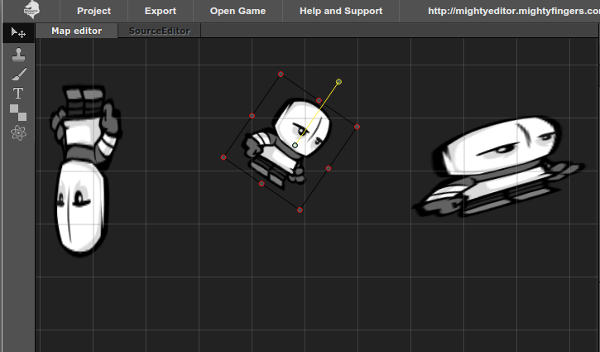
  • Added viewport width/height – now you can see bounds right on the map editor

A bit older updates:


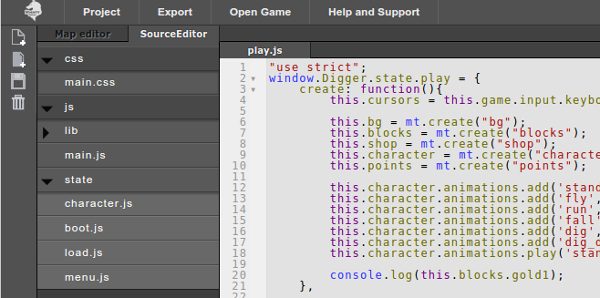
Source editor
Source editor comes with:

  • Basic autocomplete – for common javascript keywords and Phaser static members (e.g. constants)
  • jshint – so errors and typos can be cought earlier
  • Basic game template


Physics
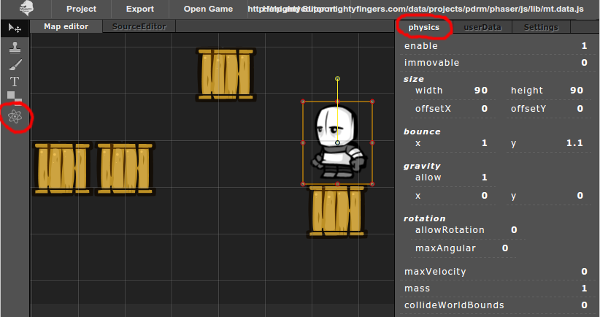
Physics is enabled by clicking on object and selecting “physics” tab from right panel. See red mark in image. You can see overview of physics objects and their bodies by selecting physics icon from left toolbar.

User data
Now you can add key/value pairs to the Asset or Object. Sprites will inherit user data from asset – it is useful if you want to create multiple objects from a single sprite in other words – use the asset as a template for multiple sprites. You can access the user data from game in the following way:

// create predefined sprite
var mySprite = mt.create("mySprite");
// get editor data from sprite
var data = mySprite.getData();
// get userData
var myData = data.userData;

Just remember that the editor data and user data are shared between sprites. e.g.

// create sprite
var mySprite1 = mt.create("mySprite");
// create same sprite again
var mySprite2 = mt.create("mySprite");
mySprite1.getData() == mySprite2.getData() // true

Tutorial ‘Digger’

In this article I will give you basic introduction to the MightyEditor and development process that surrounds it. Tutorial will show how to actually prototype a mini-game within an hour.

Requirements

Newest Google Chrome browser. You can try other browsers, but we don’t test them yet.

What is MightyEditor?

MightyEditor is open-source cloud based solution for creating and hosting HTML5 games. It is compatible with Phaser game development framework, but you can also use it with other tools. Main features of the editor are: asset management, map editing, code editor, data export.

How does MightyEditor work?

Design process of using editor works by following steps:

  1. Create a project
  2. Upload assets
  3. Drag and drop assets to the map
  4. Group assets in layers e.g. background, blocks…
  5. Add collisions and functionality in code editor
  6. Open game and export data

Why should I use MightyEditor?

Having a browser based tool with all of the basic functionality of map and code editor allows you to focus on fast prototyping of games. Open a link in browser and you are good to go. There is no hassle with installing and configuring various software solutions thus saving your precious time.

Cooperation with designer, another team member or a client has been made as easy as sharing link to the project. You can really work as a team, assign an illustrator to dealing with assets while game designer creates different levels in map editor and developer adds functionality with JavaScript code.

MightyEditor does not require your project to depend on it. All assets and code can be exported at any time. Whats even better – the editor is open-source and data can be moved to your local machine with local version of editor. The source code can be found on github  https://github.com/TheMightyFingers/mightyeditor.

Idea of mini-game

In this tutorial we will create a simple mini-game called Digger. The game is about a little miner who digs dirt block for gold and sells various minerals at the store. Arrow keys will be used for navigation and a simple physics and collision will be added to miner object.

Creating a project

Open the link http://mightyeditor.mightyfingers.com. Enter project title – in this case it will be Digger.

On the bottom right panel enter game dimensions: worldWidth, worldHeight 640 x 640. For sake of simplicity we will set view-port sizes the same 640 x 640.

 Upload game assets

In the following part of tutorial we will use assets that you can download here. On the top right panel from select list use upload file option and add files. Alternatively you can drag and drop files on to the panel and the assets will upload automatically.

Create a map

Click stamp icon on the left tool panel and then select background_sky.png in assets panel and then click on map thus creating background (hold Ctrl button for snapping to grid). You can change position of background by selecting arrow from the left tool panel. For more accurate positioning change x, y position in the settings panel.

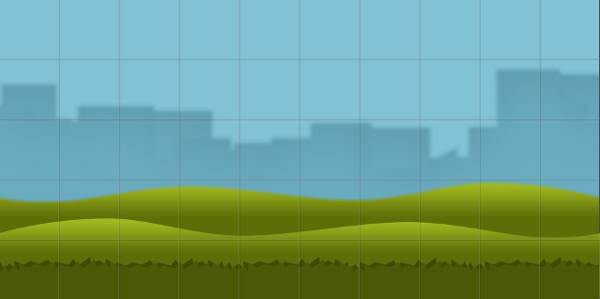
Then repeat this step with following assets: background_city.png, background_hill1.png, background_hill2.png, background_grass.png. At the end everything should look like it’s shown in the following image

Create group

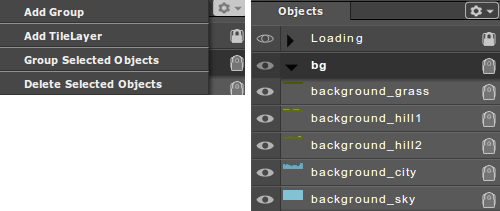
Let’s create group for newly created background objects. On right panel Objects section from select list choose Add Group. Rename group to bg and drag objects to this group. To drag multiple objects hold Shift key.

Add rest of graphics

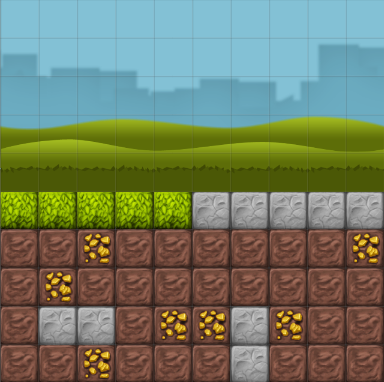
Let’s create 5 rows of blocks under background. There are four different types of them: rock, ground, grass, gold. Gold blocks are collectible and you can’t dig rocks. Objects have to be added in blocks group.

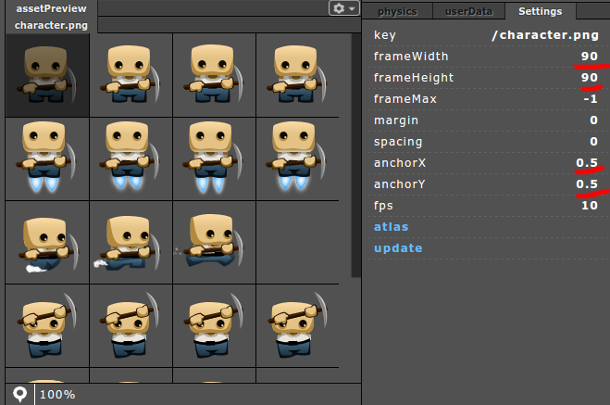
Finally we need to add character and shop objects. As for the character asset – the image contains multiple frames. We need to define frame width and height in bottom right panel Settings panel. The size is 90 x 90. Separated frames can be viewed at bottom assetPreview panel. Also edit anchorX and anchorY. Set them both to 0.5

You can also define your own variables for object. Open userData tab in the same panel and add gold parameter with 0 value;

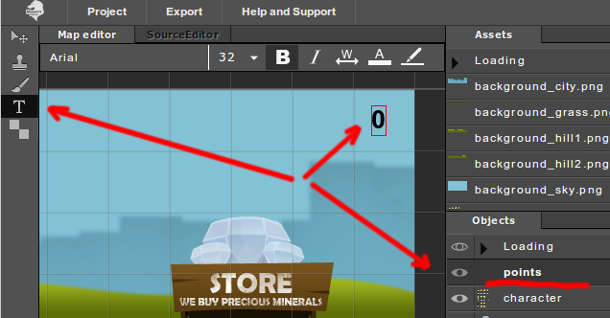
Select text icon on left tools panel and put a text object on top right corner of map. Write “0” as text will represent points. Rename text object in Objects panel on the right side.

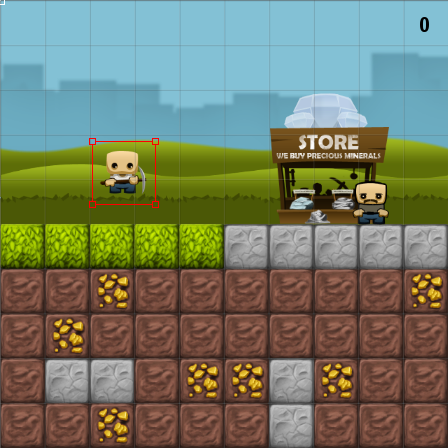
Now we are ready to add objects and finish working with map editing. Character and shop objects are added like in image below

We have finished graphical part of tutorial. Next we’ll go in to coding and adding functionality like character controls, collisions, etc.

Source editor

Switch to source editor on top left side.

On the left side menu with game files are displayed. You will have to code mostly in state/play.js file. You can find key shortcodes for the editor here.

Game states

For coding we are going to use Phaser development framework. The states in Phaser are a separate parts of the game logic. By default editor gives you a template with four states boot, load, menu, play. For each state there are some predefined methods: preload, create, update, render. For demo purposes you should know that create method is called right after all assets are loaded and update method is called by game loop 60 times a second. You can learn more in documentation.

By default template calls load state. We need to redirect to play state. For this edit menu.js file under create method.

window.Digger.state.load = {
    preload: function(){
        ...
    },

    create: function() {
        this.game.state.start("play");
    }
}

Open game

First open game from top panel Open game button. At the moment there is only black screen. To display just made objects we have to initialize them in play.js file create method.

create: function() {
    this.bg = mt.create("bg");
    this.blocks = mt.create("blocks");
    this.shop = mt.create("shop");
    this.character = mt.create("character");
    this.points = mt.create("points");
}

Initializing is done with mt.create function. “bg” and “blocks” represent group names in object panel on the right side. “shop” and “character” represent sprite names in the same panel and finally “points” represent text. As you see all objects group, sprite and text are initialized with the same method.

Open the game now and initialized objects will be visible on the screen.

Adding physics

By default physics are disabled in Phaser for better performance reasons. We will enable the lightest and fastest physics from all available – Arcade physics. Open physics tab in bottom right corner. Change parameter enable to 1 and rest of parameters will appear below. Set character body size width: 60 and height 60. Enable gravity and set y to 1000. At last set collideWorldBounds parameter to 1.

Opening game you will see character falling down to the bottom of the screen.

Character controls

Initialize cursor keys in create method.

this.cursors = this.game.input.keyboard.createCursorKeys();

This  function give us an object with the four arrow keys to play with: up, down, left and right. In update method we will track when left/right/up arrow key is pressed and give a velocity to character or stop it keys are not inactive.

update: function() {
    if (this.cursors.left.isDown) {
        this.character.body.velocity.x = -200;
    } else if (this.cursors.right.isDown) {
        this.character.body.velocity.x = 200;
    } else {
        this.character.body.velocity.x = 0;
    } if (this.cursors.up.isDown) {
        this.character.body.velocity.y = -300;
    }
}

Open game and try arrow keys to control character.

Collision between character and blocks

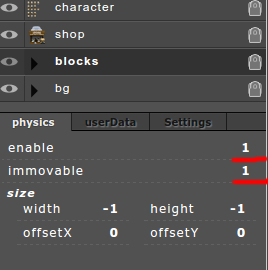
Enable physics for blocks and set them immovable in the Map editor bottom right physics panel.

Next add collision detection in update method. First two arguments declare that we will check collision between sprite object and group of object. Third argument is a 2 argument function which is called on collision.

this.game.physics.arcade.collide(this.character, this.blocks, function(character, block) {
    console.log('Collision between', character, block);
}, null, this);

Opening game you will see character won’t fall to the end of screen, but will land on top of the blocks.

Character animations

First we need to define frames in spritesheet for different types of animations. Add these lines in create method.

this.character.animations.add('stand', [0, 1, 2, 3], 10, true);
this.character.animations.add('fly', [4, 5, 6, 7], 10, true);
this.character.animations.add('run', [8, 9, 10], 10, true);
this.character.animations.add('fall', [12, 13, 14, 15], 10, true);
this.character.animations.add('dig', [16, 17, 18], 10, false);
this.character.animations.add('dig_down', [20, 21, 22], 10, false);
this.character.animations.play('stand');

Last line of code starts play default animation stand.

For rest of animations we have to change update method and add play specific animation for each key press. Note that we have the same animation for left and right run. In order to flip horizontally sprite we are using scale -1.

if (this.cursors.left.isDown) {
    this.character.body.velocity.x = -200;
    this.character.animations.play('run');
    this.character.scale.x = -1;
} else if (this.cursors.right.isDown) {
    this.character.body.velocity.x = 200;
    this.character.animations.play('run');
    this.character.scale.x = 1;
} else {
    this.character.body.velocity.x = 0;
    this.character.animations.play('stand');
} if (this.cursors.up.isDown) {
    this.character.body.velocity.y = -300;
    this.character.animations.play('fly');
}

Destroying blocks

In order to dig blocks we need to add functionality to our collide function:

this.game.physics.arcade.collide(this.character, this.blocks, function(character, block) {
    if (this.cursors.left.isDown) {
        if (block.body.touching.right) {
            this.destroyBlock(block);
        }
    }
    else if (this.cursors.right.isDown) {
        if (block.body.touching.left) {
            this.destroyBlock(block);
        }
    }
    else if (this.cursors.down.isDown) {
        if (block.body.touching.up) {
            this.destroyBlock(block);
        }
    }
}, null, this);

Various blocks need to be handled differently. Grass and ground blocks are simply destroyed, rocks are indestructible and we can collect gold and save it in character gold parameter. Add destroyBlock method under play state.

destroyBlock: function(block) {
    switch (block.key) {
        case '/rock.png':
            break;
        case '/grass.png':
        case '/ground.png':
            block.destroy();
            break;
        case '/gold.png':
            this.character.getData().userData.gold++;
            block.destroy();
            break;
    }
},

Overlapping and selling gold

In the next step we need to sell collected gold at the shop. At first you need to go back to map editor and set physics for shop object similar how it was done with character. Set parameters enable: 1, gravity->allow: 0, immovable: 1. After that go to source editor and change update method with following lines:

this.game.physics.arcade.overlap(this.character, this.shop,
    function(character, shop) {
        if (character.getData().userData.gold > 0) {
            var newPoints = parseInt(this.points._text) + character.getData().userData.gold;
            this.points.setText(newPoints);
            character.getData().userData.gold = 0;
        }
    }, null, this
);

Refactoring and adding final animations

We will add digging animations as final step of this tutorial and re-factor update method to meet our needs of good looking game. Given previous samples the code below should be self explaining.

"use strict";
window.Digger.state.play = {	
	create: function(){
		this.cursors = this.game.input.keyboard.createCursorKeys();
		
		this.bg = mt.create("bg");
		this.blocks = mt.create("blocks");
		this.shop = mt.create("shop");
		this.character = mt.create("character");
		this.points = mt.create("points");
		
		this.character.animations.add('stand', [0, 1, 2, 3], 10, true);
		this.character.animations.add('fly', [4, 5, 6, 7], 10, true);
		this.character.animations.add('run', [8, 9, 10], 10, true);
		this.character.animations.add('fall', [12, 13, 14, 15], 10, true);
		this.character.animations.add('dig', [16, 17, 18], 10, false);
		this.character.animations.add('dig_down', [20, 21, 22], 10, false);
		this.character.animations.play('stand');
	},
	
	update: function(){
		var collideDown = false;
		this.game.physics.arcade.collide(this.character, this.blocks,
		  function(character, block){
			
			if(this.dig) return;	
				
			if(this.cursors.left.isDown){		
				if(block.body.touching.right){
					this.dig = this.character.animations.play('dig');
					this.dig.onComplete.addOnce(function(){
      					this.destroyBlock(block);
					}, this);							
				} else {
					this.character.animations.play('run');
				}					
			}

			else if(this.cursors.right.isDown){					
				if(block.body.touching.left){
					this.dig = this.character.animations.play('dig');
					this.dig.onComplete.addOnce(function(){
      					this.destroyBlock(block);
					}, this);					
				} else {
					this.character.animations.play('run');
				}

			}

			else if(this.cursors.down.isDown){					
				if(block.body.touching.up){
					this.dig = this.character.animations.play('dig_down');
					this.dig.onComplete.addOnce(function(){
      					this.destroyBlock(block);
					}, this);

				} else {
					this.character.animations.play('stand');
				}
			}		
			
			if(block.body.touching.up){
				collideDown = true;
			}


		}, null, this);
										 
		
		if(this.dig){
			return;	
		}
		

		if(this.cursors.left.isDown){
			this.character.scale.x = -1;
			this.character.body.velocity.x = -200;
		}
		else if(this.cursors.right.isDown){
			this.character.scale.x = 1;
			this.character.body.velocity.x = 200;
		}
		else {
			this.character.body.velocity.x = 0;	
		}
		
		
		if(this.cursors.up.isDown){
			this.character.body.velocity.y = -300;
			this.character.animations.play('fly');
		} else {
			if(!collideDown){
				this.character.animations.play('fall');
			}
			else if(this.character.body.velocity.x === 0){
				this.character.animations.play('stand');
			}
		}
		
		this.game.physics.arcade.overlap(this.character, this.shop,
		 	function(character, shop){
				if(character.getData().userData.gold > 0){
					var newPoints = parseInt(this.points._text) + character.getData().userData.gold;
					this.points.setText(newPoints);
					character.getData().userData.gold = 0;
				}
			}, null, this
		);
	},
	
	destroyBlock: function(block){
		this.dig = false;
		switch(block.key){
			case '/rock.png':
				break;
			case '/grass.png':
			case '/ground.png':
				block.destroy();
				break;
			case '/gold.png':
				this.character.getData().userData.gold++;
				block.destroy();
				break;
		}
	},
	
	stopDig: function(){
		this.dig = false;	
	}
};

Full game project is available here: http://mightyeditor.mightyfingers.com/#pde5-copy
Final game here: http://mightyeditor.mightyfingers.com/data/projects/pde5/phaser/index.html
iframe:

Сделай быстро игру используя Phaser и MightyEditor

В этой статье я опишу основные возможности MightyEditor и процесс разработки игр. Учебник покажет как сделать HTML5 мини-игру в течение часа.

Требования

Новейший браузер Google Chrome. Можно попробовать и другие браузеры, но мы их еще не тестировали.

Что такое MightyEditor?

MightyEditor это онлайн редактор для создания и хостинга HTML5 игры. Он с открытым исходным кодом и совместим с популярным игровым движком Phaser, но вы также можете использовать его и с другими движками. Основные особенности редактора являются: ассет менеджмент, редактирование карт, редактор кода и экспорт данных.

Как работает MightyEditor?

Процесс использования редактора работает следующим образом:

  1. Создание проекта
  2. Загрузка текстур
  3. Создание карты
  4. Групирование текстуры в слоях например фон, блоки…
  5. Добавить коллизий и функциональность в редакторе кода
  6. Открыть игру и экспорт данных

Почему я должен использовать редактор игр?

Имея инструмент в онлайн с функцией редактора карт и кода, позволяет сделать прототип игр быстрее. Открой ссылку в браузере, и ты готов работать. Нет лишних проблем с установкой и настройкой различных программных решений, что существенно экономит Твое драгоценное время.

Сотрудничество с дизайнером, другим разработчиком или клиентом это также просто, как отправить ссылку на проект. Вы также можете работать в команде: назначить иллюстратора который добавит графику, в то время как гейм-дизайнер создает различные уровни в редакторе карт и разработчик добавляет функциональность с JavaScript кодом.

MightyEditor не требует чтобы продукт зависел от него. Все текстуры и код можно экспортировать в любой момент. Что еще лучше – у редактора есть открытый исходный код и данные могут быть перемещены на локальный компьютер с локальной версией редактора. Исходный код можно найти на GitHub  https://github.com/TheMightyFingers/mightyeditor.

Идея мини-игры

В этом туториале мы создадим простою мини-игру под названием Digger. Игра о маленьком шахтере, который роет землю, ищет золото и продает его в магазине. Клавиши курсора будут использоваться для навигации и простоя физика и коллизия будут добавлены у объекта шахтера.

Создание проекта

Открой ссылку http://mightyeditor.mightyfingers.com. Введи название проекта –Digger.
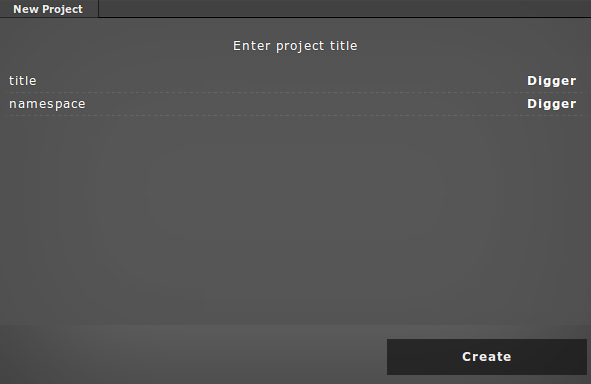
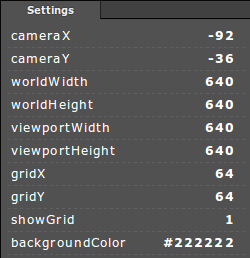
На нижней правой панели введи размеры игры: worldWidth, worldHeight 640 x 640. Для простоты мы установим view-port те же размеры 640 x 640.
Загрузка текстур

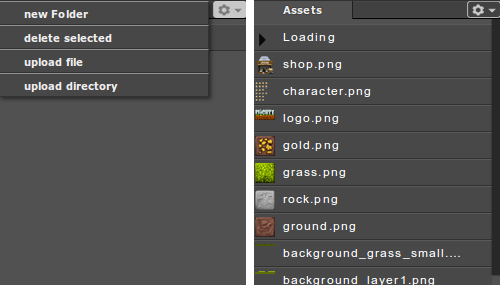
В следующей части туториала мы будем использовать текстуры, которые можно скачать здесь. В правом верхнем углу панели в списке опций выбери upload file и добавь файлы. В качестве альтернативы можно перетаскивать файлы на панель и текстуры загрузятся автоматически.
Создание карты

Нажми икону в виде штампа на левой панели, затем выбери из панели текстур background_sky.png, затем нажми на карту, таким образом создавая фон (удерживая кнопку Ctrl для привязки к сетке). Для перемещения фона, выбери стрелку в левой панели инструментов. Для более точного положения можно изменить X, Y позицию в панели настроек.

Затем повтори этот шаг со следующими текстурами: background_city.png, background_hill1.png, background_hill2.png, background_grass.png. В конце все должно выглядеть как показано на следующем изображение
Создание группы

А теперь создадим группу для созданных фоновых объектов. На правой панели Objects в списке выбора нажми Add Group. Переименуй группу на bg и перетащи объекты в эту группу. Чтобы выбрать несколько объектов удерживай клавишу Shift.
Добавление остальных текстур

Создадим 5 рядов блоков под группы фона. Есть четыре различных типа блоков: камень, земля, трава, золото (rock, ground, grass, gold). Где Ты должен собирать золотые блоки, но не можешь разбить камни. Объекты должны быть добавлены в группу blocks.
Наконец, мы должны добавить объекты герой и магазин. Что касается текстуры героя – изображение содержит несколько кадров. Нам необходимо определить ширину кадра и высоту в нижней правой панели Settings. Размер 90 x 90. Отдельные кадры можно посмотреть на нижней assetPreview панели. Также нужно отредактировать anchorX и anchorY. Установите их на 0.5
Также можно установить свои собственные переменные для объекта. Открой закладку userData на той же панели и добавь параметр золото со значением 0.
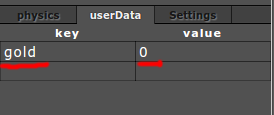
Выбери икону текст на панели слева и напиши “0” в правом верхнем углу карты, таким образом будут отображаться очки. Переименуй текстовый объект в панели Objects на points.
Теперь мы готовы добавить объекты и завершить редактирование карты. Объекты героя и магазина добавляются следующем образом
Мы закончили графическую часть проекта. Далее мы начнем программирование и добавления функциональности: управление героем, физику, коллизии и т.д.

Редактор кода

Перейдем к редактору кода на верхней левой стороне.
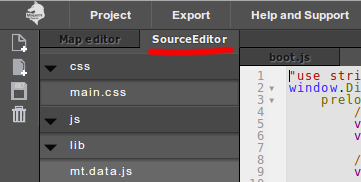
На левой стороне отображается список с игровыми файлами. В основном программировать нужно будет в файле state/play.js . Вы можете найти ключевые шорткоды для редактора здесь.

Стейты игры

Для программирования мы собираемся использовать популярный игровой движок Phaser. По умолчанию, редактор дает шаблон с четырьмя стейтами boot, load, menu, play. Для каждого стейта есть некоторые предопределенные методы: preload, create, update, render. Для этого проекта Ты должен знать два метода: метод create вызывается сразу после того, когда все текстуры загрузились и метод update вызывается в игровом цикле 60 раз в секунду. Больше можно узнать в документации.

По умолчанию шаблон вызывает menu стейт. Для простоты мы не будем создавать меню на этот раз и начнем с геймплей. Для этого нужно вызвать play стейт в menu.js файле под метод create .

window.Digger.state.menu = {
    create: function() {
        this.game.state.start("play");
    }
}

Открой игру

Нажми на кнопку Open game на верхней панели, появиться черный экран. Для отображения только что созданных объектов мы должны инициализировать их в play.js под create метод.

create: function() {
    this.bg = mt.create("bg");
    this.blocks = mt.create("blocks");
    this.shop = mt.create("shop");
    this.character = mt.create("character");
    this.points = mt.create("points");
}

Инициализация делается с mt.create функции. “bg” и “blocks” представляют имена групп в панели объектов в правой стороне. “shop” и “character” представляют имена спрайтов, в той же панели и, наконец, “points” представляют текст. Как Ты видишь все объекты (группы, спрайты и текст) инициализируются тем же методом.

Откройте игру сейчас и объекты будут видны на экране.

Добавление физики

По умолчанию физика в Phaser отключена, для лучшей производительности. Мы включим самую легкую и быструю физику из всех доступных – Arcade physics. Откройте вкладку физики в нижнем правом углу. Измените параметр enable на 1 и остальные параметры появятся ниже. Установите размер тела героя width: 60 и height 60. Включите гравитацию и установите y на 1000. И в конце установите collideWorldBounds параметр на 1.
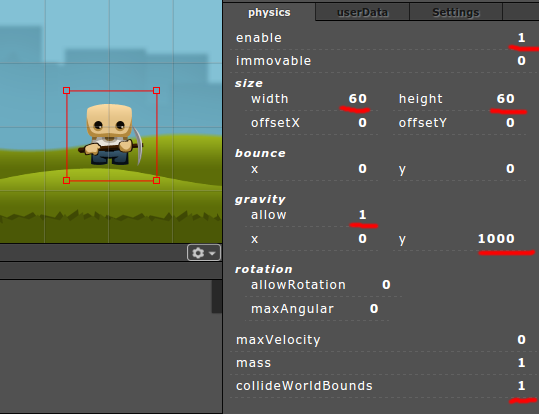
При открытие игры Ты увидеш героя, падающего в нижнюю часть экрана.

Управления героем

Инициализируи клавиши управления в методе create.

 
this.cursors = this.game.input.keyboard.createCursorKeys();

Эта функция дает нам объект с четырьмя клавишами со стрелками: up, down, left and right. В методе update отследим когда будет нажата клавиша left/right/up и дадим скорость дла героя или остановим его если клавиши не активны.

update: function() {
    if (this.cursors.left.isDown) {
        this.character.body.velocity.x = -200;
    } else if (this.cursors.right.isDown) {
        this.character.body.velocity.x = 200;
    } else {
        this.character.body.velocity.x = 0;
    } if (this.cursors.up.isDown) {
        this.character.body.velocity.y = -300;
    }
}

Открой игру и нажми клавиши со стрелками для управления героя.

Коллизии между героям и блоками

Включи физику для блоков и установи их недвижимым в Map editor в правом нижнем панели физики.
Добавим коллизии в методе update. Первые два аргумента означает, что мы будем проверять коллизии объекта спрайта и группы. Третий аргумент является функцией, которая вызывается на столкновений.

this.game.physics.arcade.collide(this.character, this.blocks.self, function(character, block) {
    console.log('Collision between', character, block);
}, null, this);

Открывая игру, герой не будет падать до конца экрана, но приземлится сверху блоков.

Анимации героя

Мы должны определить кадри в спрайт листе для различных типов анимации. Добавьте эти строки в метод create.

this.character.animations.add('stand', [0, 1, 2, 3], 10, true);
this.character.animations.add('fly', [4, 5, 6, 7], 10, true);
this.character.animations.add('run', [8, 9, 10], 10, true);
this.character.animations.add('fall', [12, 13, 14, 15], 10, true);
this.character.animations.add('dig', [16, 17, 18], 10, false);
this.character.animations.add('dig_down', [20, 21, 22], 10, false);
this.character.animations.play('stand');

Последняя строка кода начинает анимацию stand.

Для остальной части анимации мы должны изменить метод update и добавить анимацию для каждого нажатия клавиши. Обратите внимание, что мы имеем ту же анимацию run для левой и правой стрелки клавишы. Для того, чтобы переворачивать по горизонтали спрайт мы используем scale -1.

if (this.cursors.left.isDown) {
    this.character.body.velocity.x = -200;
    this.character.animations.play('run');
    this.character.scale.x = -1;
} else if (this.cursors.right.isDown) {
    this.character.body.velocity.x = 200;
    this.character.animations.play('run');
    this.character.scale.x = 1;
} else {
    this.character.body.velocity.x = 0;
    this.character.animations.play('stand');
} if (this.cursors.up.isDown) {
    this.character.body.velocity.y = -300;
    this.character.animations.play('fly');
}

Уничтожение блоков

Для того, чтобы копать блоки нужно добавить функциональность для нашей функции колизии:

this.game.physics.arcade.collide(this.character, this.blocks.self, function(character, block) {
    if (this.cursors.left.isDown) {
        if (block.body.touching.right) {
            this.destroyBlock(block);
        }
    }
    if (this.cursors.right.isDown) {
        if (block.body.touching.left) {
            this.destroyBlock(block);
        }
    }
    if (this.cursors.down.isDown) {
        if (block.body.touching.up) {
            this.destroyBlock(block);
        }
    }
}, null, this);

Различные блоки должны быть обработаны по-разному. Блоки травы и земли просто уничтожается, каменьы нерушимы и мы можем собирать золото и сохранить его в параметре у героя. Добав метод destroyBlock под стейт play.

destroyBlock: function(block) {
    switch (block.key) {
        case '/rock.png':
            break;
        case '/grass.png':
        case '/ground.png':
            block.destroy();
            break;
        case '/gold.png':
            this.character.getData().userData.gold++;
            block.destroy();
            break;
    }
},

Перекрытие и продажа золота

На следующем шаге мы должны продать собранную золото в магазине. В конце метода update добавьте следующие строки:

if (this.checkOverlap(this.character, this.shop)) {
    if (this.character.getData().userData.gold > 0) {
        var newPoints = parseInt(this.points._text) + this.character.getData().userData.gold;
        this.points.setText(newPoints);
        this.character.getData().userData.gold = 0;
    }
}

И создаи новый метод под стейт play state который проверяет границы героя и магазина:

checkOverlap: function(spriteA, spriteB) {
    var boundsA = spriteA.getBounds();
    var boundsB = spriteB.getBounds();
    return Phaser.Rectangle.intersects(boundsA, boundsB);
}

Рефакторинг и добавления окончательных анимации

Мы добавим анимации dig и сделаем рефактор в методе update для удовлетворения красивой игры. Учитывая предыдущие образцы, код ниже должны быть понятен.

"use strict";
window.Digger.state.play = {	
	create: function(){
		this.cursors = this.game.input.keyboard.createCursorKeys();

		this.bg = mt.create("bg");
		this.blocks = mt.create("blocks");
		this.shop = mt.create("shop");
		this.character = mt.create("character");
		this.points = mt.create("points");

		this.character.animations.add('stand', [0, 1, 2, 3], 10, true);
		this.character.animations.add('fly', [4, 5, 6, 7], 10, true);
		this.character.animations.add('run', [8, 9, 10], 10, true);
		this.character.animations.add('fall', [12, 13, 14, 15], 10, true);
		this.character.animations.add('dig', [16, 17, 18], 10, false);
		this.character.animations.add('dig_down', [20, 21, 22], 10, false);
		this.character.animations.play('stand');
	},

	update: function(){
		var collideDown = false;
		this.game.physics.arcade.collide(this.character, this.blocks.self,
		  function(character, block){

			if(this.dig) return;	

			if(this.cursors.left.isDown){		
				if(block.body.touching.right){
					this.dig = this.character.animations.play('dig');
					this.dig.onComplete.addOnce(function(){
      					this.destroyBlock(block);
					}, this);							
				} else {
					this.character.animations.play('run');
				}					
			}

			if(this.cursors.right.isDown){					
				if(block.body.touching.left){
					this.dig = this.character.animations.play('dig');
					this.dig.onComplete.addOnce(function(){
      					this.destroyBlock(block);
					}, this);					
				} else {
					this.character.animations.play('run');
				}

			}

			if(this.cursors.down.isDown){					
				if(block.body.touching.up){
					this.dig = this.character.animations.play('dig_down');
					this.dig.onComplete.addOnce(function(){
      					this.destroyBlock(block);
					}, this);

				} else {
					this.character.animations.play('stand');
				}
			}		

			if(block.body.touching.up){
				collideDown = true;
			}

		}, null, this);

		if(this.dig){
			return;	
		}

		if(this.cursors.left.isDown){
			this.character.scale.x = -1;
			this.character.body.velocity.x = -200;
		}
		else if(this.cursors.right.isDown){
			this.character.scale.x = 1;
			this.character.body.velocity.x = 200;
		}
		else {
			this.character.body.velocity.x = 0;	
		}

		if(this.cursors.up.isDown){
			this.character.body.velocity.y = -300;
			this.character.animations.play('fly');
		} else {
			if(!collideDown){
				this.character.animations.play('fall');
			}
			else if(this.character.body.velocity.x === 0){
				this.character.animations.play('stand');
			}
		}

		if(this.checkOverlap(this.character, this.shop)){
			if(this.character.getData().userData.gold > 0){
				var newPoints = parseInt(this.points._text) + this.character.getData().userData.gold;
				this.points.setText(newPoints);
				this.character.getData().userData.gold = 0;
			}
		}
	},

	destroyBlock: function(block){
		this.dig = false;
		switch(block.key){
			case '/rock.png':
				break;
			case '/grass.png':
			case '/ground.png':
				block.destroy();
				break;
			case '/gold.png':
				this.character.getData().userData.gold++;
				block.destroy();
				break;
		}
	},

	checkOverlap: function (spriteA, spriteB) {
    	var boundsA = spriteA.getBounds();
    	var boundsB = spriteB.getBounds();
    	return Phaser.Rectangle.intersects(boundsA, boundsB);
	},

	stopDig: function(){
		this.dig = false;	
	}
};

Полный проект игры доступен здесь: http://mightyeditor.mightyfingers.com/#pde5-copy
Финальная игра: http://mightyeditor.mightyfingers.com/data/projects/pde5/phaser/index.html
iframe:
Texture atlas support

After many user requests we are happy to announce arrival of texture atlas support to MightyEditor. Now you can pack textures to single image thus reducing game load time.

Usage

Upload an image

Select uploaded image

In the settings panel, click atlas and select atlas data file to start uploading

At the moment, the editor supports the same data formats as the Phaser:

* TEXTURE_ATLAS_JSON_ARRAY

* TEXTURE_ATLAS_JSON_HASH

* TEXTURE_ATLAS_XML_STARLING

The data format is detected automatically.

Data formats can be added additionally, if you need one – just make a request.

After atlas has been loaded, the editor will make a preview image of a full atlas and for every frame separately (useful for animations). Image below, on the left size is the full atlas and on the right side button textures are nicely separated under ‘button’ tab.

At the moment, we don’t think that the atlas creation tool has a high priority – but we will add it eventually. For the image atlas creation, you can use any 3rd party tool you have used before or one of the following:

Free

Commercial

More info can be found on this thread: HTML5 gamedev forum.

The next features to be added:

  • Source code editor – your game can be launched straight from the editor
  • Timeline for sprite animations and tween keyframes