
This tutorial will give you an example on how to use MightyEditor – an online level editor based on popular game framework Phaser. Article will take about an hour and only ~140 lines of actual code. Following game development aspects will be introduced: sprites, sprite animations, game states, tween animations, user input, game loop, user interface.
Benefits of using MightyEditor are very fast prototyping of games, no need to install and configure software, ease of collaboration with team and open source. Also check out also features and tutorials of editor.
Game idea
The idea is based on Timberman mobile game. You have to chop never ending tree and avoid its branches by tapping left and right side of screen. Sounds very simple but actually it is quite addictive. This time we are going to smash rocks instead of chopping tree and let’s call the game “Rocky Smasher”.
Requirements
A browser! And that’s all. Try the newest version of Google Chrome. Other browsers should work, but are not tested that well.
Starting a project
Open MightyEditor and click “Create New Project” button. New game popup will be shown where you can type project name. Enter it and press “Create”.
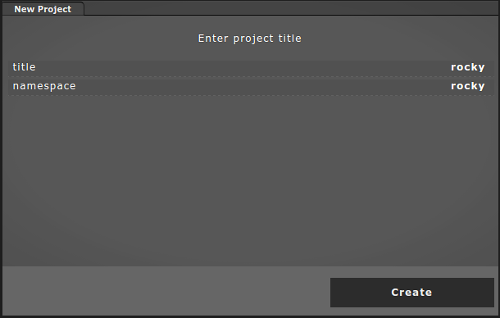
Empty game project will be created. Go to bottom right Settings panel to change following parameters like it is shown in picture below.
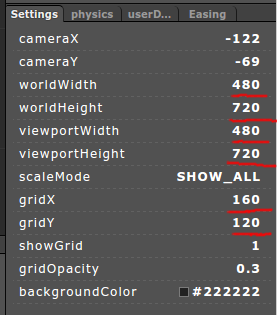
Note that we have set up world and viewport sizes exact 480x720px thus we see everything on the screen. There is a camera concept in a lot of games when you see only small fraction from game world. But this is not the case, we don’t need it for Rocky Smasher. A grid concept helps to snap graphics to certain tile so we have set grid size to 160x120px.
Uploading game assets
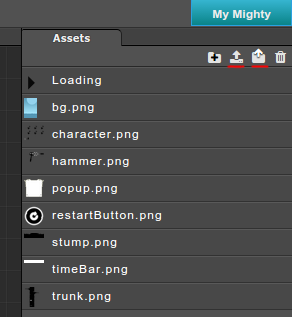
Download game assets. Find Asset panel on top right side. You can upload assets by “Upload File” or “Upload Folder” icons or just drag and drop them from your file system.
Creating a map
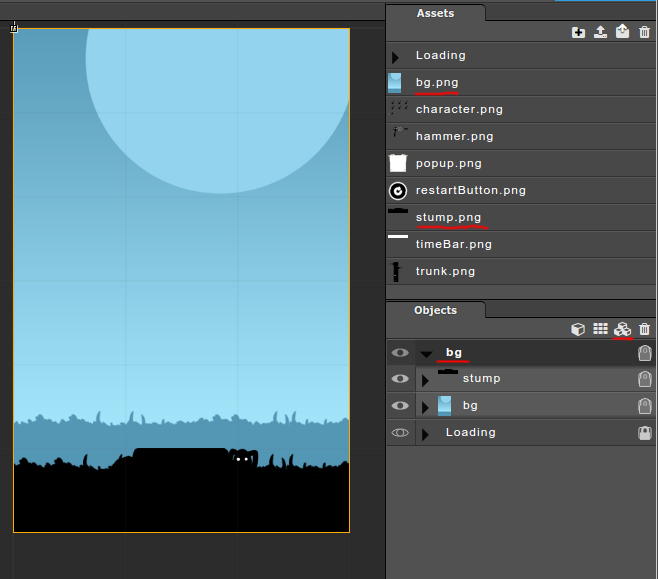
Drag and drop “bg.png” and “stump.png” on to map. By holding Ctrl images will snap to grid. An alternative way is to do it with Stamp and Brush tools on left tool panel.
Navigate to Objects panel right below Assets panel on right side. Select both newly created objects and click group them by clicking highlighted icon in image. Rename this group to “bg”. The result should be following:
Sprite frames
Add a new group called “trunk” to Objects panel and then select “trunk.png” image in asset panel. You will notice that trunk does consist of 5 frames. We need to separate them in editor. For doing this keep selected image and locate Settings panel on bottom right. Change FrameWidth to 480 and FrameHeight to 120 pixels. You will see separated frames in “assetPreview” panel in the bottom.
![]()
After that select Brush tool from right panel and add 5 different pieces of trunk starting from bottom to top. It is very important to follow given order. If it is not correct then you have to changing it in Objects panel by rearranging “trunk” group elements.
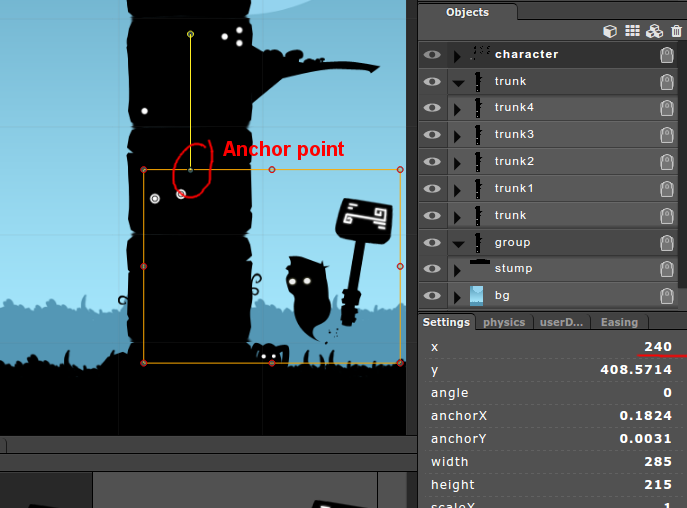
After trunk you need to add character. We don’t need a group for only one element so we can create a simple sprite object. But before that FrameWidth and FrameHeight needs to be defined similar to trunk sprite. This time we set following dimensions 285x215px. Note that in the game character needs to change sides of tree. That is why we will flip image and very important aspect of flipping is anchor point. By default it is allways at 0, 0 (top left) point of image. For this case we will manually drag it to be in the center and to be even more precise you can define that this point x is 240px in Settings tab. Check out a screenshot of how it should look like.
Game Over popup
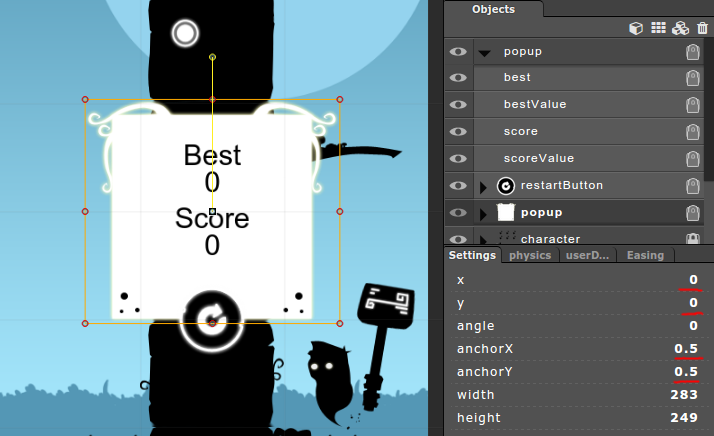
When finishing game we need to show game over popup. Let’s create a group in Objects panel called “popup”. By default group coordinates are x:0, y:0, but in this case it would be easier if we set them in game world center. Select group and navigate to Settings tab. Change coordinates x: 240, y: 360.
When the group is created then add in it “popup.png” and “restartButton.png”. At last add 4 text objects with help of text tool on left panel. In short “score” will represent points in current game and “best” the highest result you have got. Note that you need to set anchor point x: 0.5, y: 0.5 and coordinate x: 0. So all objects are aligned to group center and the group is aligned in the middle of game world. Check out screenshot with popup object parameters.
Minimal user interface
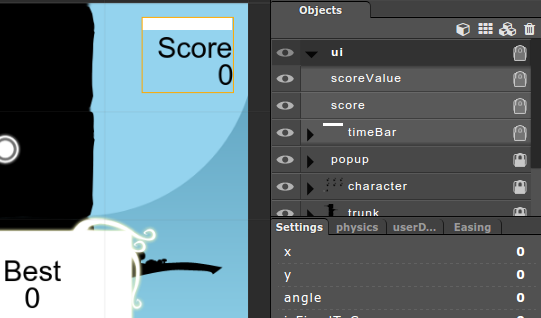
The last graphical thing we need to do is a minimal user interface which we will show on to right corner of the game. For this create a group “ui” and put there 3 objects: a time bar, score text and score value text.
Source editor
From now on we will dig in to the JavaScript code. On the top left corner locate Source editor tab. Opening it you will see file tree on the left side and code on the right.
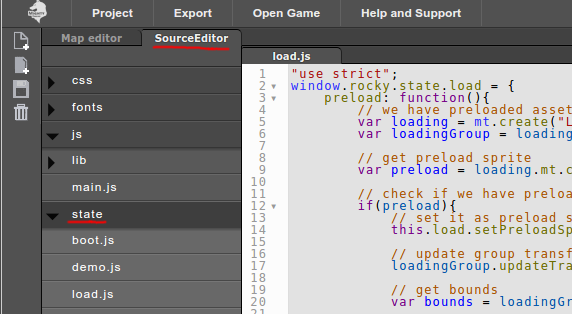
To define game logic Phaser has game state concept. We will focus on play state. But before we need to switch on this state from load state. Select js -> state -> load.js and change create method the following way so it loads play state:
"use strict";
window.rocky.state.load = {

    ...

    create: function() {
        this.game.state.start("play");
    }
};
There is a certain structure how you organize state classes. In short you need that there are couple reserved method names. You need to know at this moment that in preload method assets are loaded, create method is called right after preload and update method is a game loop called 60 times per second. For more check out Phaser documentation.
Display objects
Go to play state js -> state -> play.js and write code to display objects from Objects panel. To do so we will use mt.create() helper.
"use strict";
window.rocky.state.play = {
    create: function() {
        this.bg = mt.create('bg');
        this.trunk = mt.create('trunk');
        this.character = mt.create('character');
        this.ui = mt.create('ui');
    },

    update: function() {

    }
};
Note that ‘bg’, ‘trunk’, ‘character’ and ‘ui’ names are the same you can find in Object panel.
Now click “Open Game” button in top menu and you should see displayed objects in a game.
Animate character
We need to add animations for character. This can be done in animations property with add and play functions. There will be idle animation with 6 frames defined in array and chop animation consisting of only one frame. Add these 3 lines to create method.
create: function() {
    ...

    this.character.animations.add('idle', [0, 1, 2, 3, 4, 5], 10, true);
    this.character.animations.add('chop', [6], 10, false);
    this.character.animations.play('idle');
},
Handle inputs
Game needs to be controlled arrow keys on desktop and tapping on mobile. That is why we implement both options in create method. At first arrow cursors is defined with this.game.input.keyboard.createCursorKeys() and the check if right or left arrow is pressed with onDown parameter and if event triggers we send a direction -1 or 1 (left or right) to chop method. For clicking or tapping we use this.game.input and check same onDown. The only difference is that we calculate on which side of game screen is clicked by checking this.game.input.activePointer.x
create: function() {
    ...

    this.cursors = this.game.input.keyboard.createCursorKeys();
    this.cursors.left.onDown.add(function() {
        this.chop(-1);
    }, this);
    this.cursors.right.onDown.add(function() {
        this.chop(1);
    }, this);
    this.game.input.onDown.add(function() {
        var direction = this.game.input.activePointer.x <= this.game.width / 2 ? -1 : 1;
        this.chop(direction);
    }, this);
},
As for chop method, we create it under play state and inside it flip character sprite depending on user input.
chop: function(direction) {
    this.character.scale.x = direction;
}
Open game and character should move left/right depending on arrow keys or mouse click.
Chop tree
Lets add chop animation for character and method for removing trunk at bottom and adding trunk at the top of tree.
chop: function(direction) {
    this.character.scale.x = direction;

    var anim = this.character.animations.play('chop');
    anim.onComplete.add(function() {
        this.character.animations.play('idle');
    }, this);
    this.addTrunk();
    this.removeTrunk();
},
Adding trunk happens with this.trunk.create() method. We need to check if trunk at the very top has branch. If it has then next trunk will be without branches. If the top trunk doesn't have branch then we will give 75% chance that next trunk will have. The branch itself is a frame in spritesheet. "trunk.png" asset has 5 frames where frame nr. 0 has branch to left, 1st frame has branch to right and rest 3 frames have no branches at all.
addTrunk: function() {
    var topTrunk = this.trunk.getTop();
    var frame = 0;

    var trunk = this.trunk.create(this.game.width / 2, -120, '/trunk.png');
    // if trunk below has branch then next is without branches
    if (topTrunk.frame <= 1) {
        frame = this.game.rnd.integerInRange(2, 4);
    }
    // if trunk below doesn't have branch then 75% it will have in next
    else {
        if (this.game.rnd.integerInRange(1, 4) > 1) {
            frame = this.game.rnd.integerInRange(0, 1);
        } else {
            frame = this.game.rnd.integerInRange(2, 4);
        }
    }
    trunk.frame = frame;
    trunk.anchor.setTo(0.5, 0);
},
We get the bottom trunk from group with following method this.trunk.getBottom() and destroy it. After that iterate through group and add each object a tween to move it down.
removeTrunk: function() {
    this.trunk.getBottom().destroy();
    this.trunk.forEach(function(trunk) {
        var tween = this.game.add.tween(trunk).to({
            y: trunk.y + trunk.height
        }, 50);
        tween.start();
    }, this);
}
Check collisions
Add collision checks in chop method.
chop: function(direction) {
    this.character.scale.x = direction;
    if (this.doCollide(direction)) return;

    var anim = this.character.animations.play('chop');
    anim.onComplete.add(function() {
        this.character.animations.play('idle');
    }, this);
    this.addTrunk();
    this.removeTrunk();
    if (this.doCollide(direction)) {
        return;
    } else {

    }
},
We are checking collision with comparing character direction (-1, 1) and sprite frames (0, 1, 2, 3, 4). Before that temporary variable is created where 0 value is changed to -1 (left branch).
doCollide: function(direction) {
    var bottomTrunk = this.trunk.getBottom();
    var trunkDirection = bottomTrunk.frame === 0 ? -1 : bottomTrunk.frame;
    if (direction == trunkDirection) {
        this.die();
        return true;
    }
    return false;
},

die: function() {
    console.log('game over');
}
Timer and scoring
We need to set up some kind of limit for gameplay. It will be 10 seconds and in addition 200ms for each chop. Moreover getting more points addition time limit will be decreased. Lets add timeStarted and gameOver parameters in create method. timeBar and score are children of ui. Check out correct position in the ui group in Objects panel. For this case they will be child nr 0 and child nr 2.
create: function() {
    ...

    this.timeStarted = false;
    this.gameOver = false;
    this.timeBar = this.ui.children[0];
    this.score = this.ui.children[2];
    this.timeLeft = 10000;
},
Time is started only after first chop and timeBar is cropped depending from time left in the game. Remember that update method is called automatically 60 frames per second and it is the best place to add all time related events. Check also chop method where we have added time check and score count.
update: function() {
    if (this.timeStarted) {
        var newTime = new Date().getTime();
        this.timeLeft -= newTime - this.lastTime;
        if (this.timeLeft > 0) {
            this.lastTime = newTime;
            var cropRect = new Phaser.Rectangle(0, 0, this.timeLeft / 100, 15);
            this.timeBar.crop(cropRect);
            this.timeBar.updateCrop();
        } else {
            this.die();
        }
    }
},

chop: function(direction) {
    if (this.gameOver) return;

    if (!this.timeStarted) {
        this.lastTime = new Date().getTime();
        this.timeStarted = true;
    }

    this.character.scale.x = direction;
    if (this.doCollide(direction)) return;

    var anim = this.character.animations.play('chop');
    anim.onComplete.add(function() {
        this.character.animations.play('idle');
    }, this);
    this.addTrunk();
    this.removeTrunk();
    if (this.doCollide(direction)) {
        return;
    } else {
        var score = parseInt(this.score._text);
        score++;
        this.score.setText(score);
        this.timeLeft += 200 - score;
        if (this.timeLeft > 10000) {
            this.timeLeft = 10000;
        }
    }
},
Game Over
As the last bit of coding there needs to be game over popup shown when character dies and option to restart game for user. Similar to create method we use the same mt.create() method to show popup and access it's children elements to show current and best scores. High score is stored in localStorage. And the game can be restarted by simply calling play state this.game.state.start("play").
die: function() {
    this.timeStarted = false;
    this.gameOver = true;
    this.popup = mt.create('popup');
    var restartButton = this.popup.children[1];
    restartButton.inputEnabled = true;
    restartButton.events.onInputDown.add(function() {
        console.log('restart');
        this.game.state.start("play");
    }, this);

    var score = parseInt(this.score._text);
    var best = parseInt(localStorage.best);
    if (!localStorage.best || best < score) {
        localStorage.best = score;
        best = score;
    }
    this.popup.children[2].setText(score);
    this.popup.children[4].setText(best);
}
Full code and demo
You can find project here.
Play the game here.
Iframe:
Full code:
"use strict";
window.rocky.state.play = {
    create: function() {
        this.bg = mt.create('bg');
        this.trunk = mt.create('trunk');
        this.character = mt.create('character');
        this.ui = mt.create('ui');

        this.character.animations.add('idle', [0, 1, 2, 3, 4, 5], 10, true);
        this.character.animations.add('chop', [6], 10, false);
        this.character.animations.play('idle');

        this.cursors = this.game.input.keyboard.createCursorKeys();
        this.cursors.left.onDown.add(function() {
            this.chop(-1);
        }, this);
        this.cursors.right.onDown.add(function() {
            this.chop(1);
        }, this);
        this.game.input.onDown.add(function() {
            var direction = this.game.input.activePointer.x <= this.game.width / 2 ? -1 : 1;
            this.chop(direction);
        }, this);

        this.timeStarted = false;
        this.gameOver = false;
        this.timeBar = this.ui.children[0];
        this.score = this.ui.children[2];
        this.timeLeft = 10000;
    },

    update: function() {
        if (this.timeStarted) {
            var newTime = new Date().getTime();
            this.timeLeft -= newTime - this.lastTime;
            if (this.timeLeft > 0) {
                this.lastTime = newTime;
                var cropRect = new Phaser.Rectangle(0, 0, this.timeLeft / 100, 15);
                this.timeBar.crop(cropRect);
                this.timeBar.updateCrop();
            } else {
                this.die();
            }
        }
    },

    chop: function(direction) {
        if (this.gameOver) return;

        if (!this.timeStarted) {
            this.lastTime = new Date().getTime();
            this.timeStarted = true;
        }

        this.character.scale.x = direction;
        if (this.doCollide(direction)) return;

        var anim = this.character.animations.play('chop');
        anim.onComplete.add(function() {
            this.character.animations.play('idle');
        }, this);
        this.addTrunk();
        this.removeTrunk();
        if (this.doCollide(direction)) {
            return;
        } else {
            var score = parseInt(this.score._text);
            score++;
            this.score.setText(score);
            this.timeLeft += 200 - score;
            if (this.timeLeft > 10000) {
                this.timeLeft = 10000;
            }
        }
    },

    addTrunk: function() {
        var topTrunk = this.trunk.getTop();
        var frame = 0;

        var trunk = this.trunk.create(this.game.width / 2, -120, '/trunk.png');
        // if trunk below has branch then next is without branches
        if (topTrunk.frame <= 1) {
            frame = this.game.rnd.integerInRange(2, 4);
        }
        // if trunk below doesn't have branch then 75% it will have in next
        else {
            if (this.game.rnd.integerInRange(1, 4) > 1) {
                frame = this.game.rnd.integerInRange(0, 1);
            } else {
                frame = this.game.rnd.integerInRange(2, 4);
            }
        }
        trunk.frame = frame;
        trunk.anchor.setTo(0.5, 0);
    },

    removeTrunk: function() {
        this.trunk.getBottom().destroy();
        this.trunk.forEach(function(trunk) {
            var tween = this.game.add.tween(trunk).to({
                y: trunk.y + trunk.height
            }, 50);
            tween.start();
        }, this);
    },

    doCollide: function(direction) {
        var bottomTrunk = this.trunk.getBottom();
        var trunkDirection = bottomTrunk.frame === 0 ? -1 : bottomTrunk.frame;
        if (direction == trunkDirection) {
            this.die();
            return true;
        }
        return false;
    },

    die: function() {
        this.timeStarted = false;
        this.gameOver = true;
        this.popup = mt.create('popup');
        var restartButton = this.popup.children[1];
        restartButton.inputEnabled = true;
        restartButton.events.onInputDown.add(function() {
            console.log('restart');
            this.game.state.start("play");
        }, this);

        var score = parseInt(this.score._text);
        var best = parseInt(localStorage.best);
        if (!localStorage.best || best < score) {
            localStorage.best = score;
            best = score;
        }
        this.popup.children[2].setText(score);
        this.popup.children[4].setText(best);
    }

};
VIELEN DA8!!!!K&#N230; für diese tolle Anleitung!Ich hab mir jetzt alles ausgedruckt – und werd mich sobald wie möglich auch mal daran versuchen!!!!!!