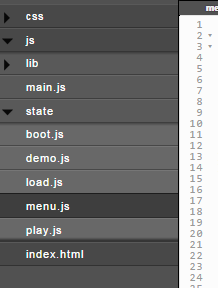
Game states are separate parts of the game. Each state can be given a completely different UI and functions. By default, MightyEditor gives you 5 states:
- boot – contains game startup processes;
- load – preloads assets;
- demo – the default state which creates all placed objects for quick game map prototyping;
- menu – game menus;
- play – actual gameplay.
The states are all viewed here:
Normally, you shouldn’t tamper with the boot and load states (only if scaling/mobile rotation is involved), as all coding will be done in the demo, menu and play states. The basic methods in each of the states are:
- preload – preloads game assets;
- create – called right after the assets are loaded and object initialization is done here. Here you can also change various properties of the game objects – add animations, enable input, change physics properties etc.;
- update – game loop, which runs 60 times per second.
An example to switching between states. First, in the scope of this example, we will skip the demo state:
In th ‘load.js’ file locate the ‘create’ function and instead of ‘this.game.state.start(“demo”)’ change ‘demo’ to ‘menu’ like this
create: function() {
    // loading has finished - proceed to demo state
    this.game.state.start("menu");
}
Then, in the ‘menu.js’ file place this code:
"use strict";
window.GameState.state.menu = {
    create: function() {
        this.text = mt.create("text");
        this.state = mt.create("menu_state");
    },

    update: function() {
        this.game.input.onDown.add(function() {
            this.game.state.start("play"); //begins play state
        }, this);
    }
};
And in the ‘play.js’ file add this:
"use strict";
window.GameState.state.play = {
    preload: function() {

    },

    create: function() {
        this.text = mt.create("text");
        this.state = mt.create("play_state");
    },

    update: function() {
        this.game.input.onDown.add(function() {
            this.game.state.start("menu"); //begins menu state
        }, this);
    }
};
Even though on the map the objects are placed on one another, by switching between the states you can choose what to display.
Full sample available here.
